The Celtic Weave Wine Gift Bag

My husband and I started our own web design and marketing business earlier this year (backpackwebdesign.com), and wanted to give a good bottle of wine to our biggest client for Christmas. I felt it wasn’t quite enough to simply hand over a paper-wrapped bottle to the lovely couple we worked with, and so came up with a design for a crocheted gift bag. This project ended up making me very excited, first because I got to learn a new stitch, and second because this was the first time I had designed something from scratch!

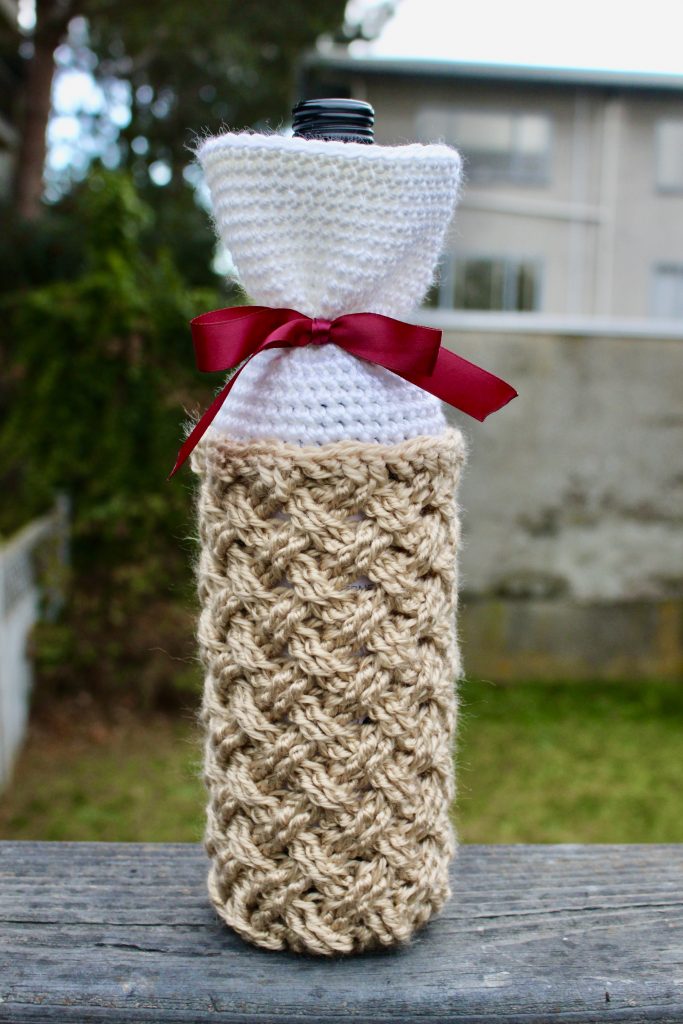
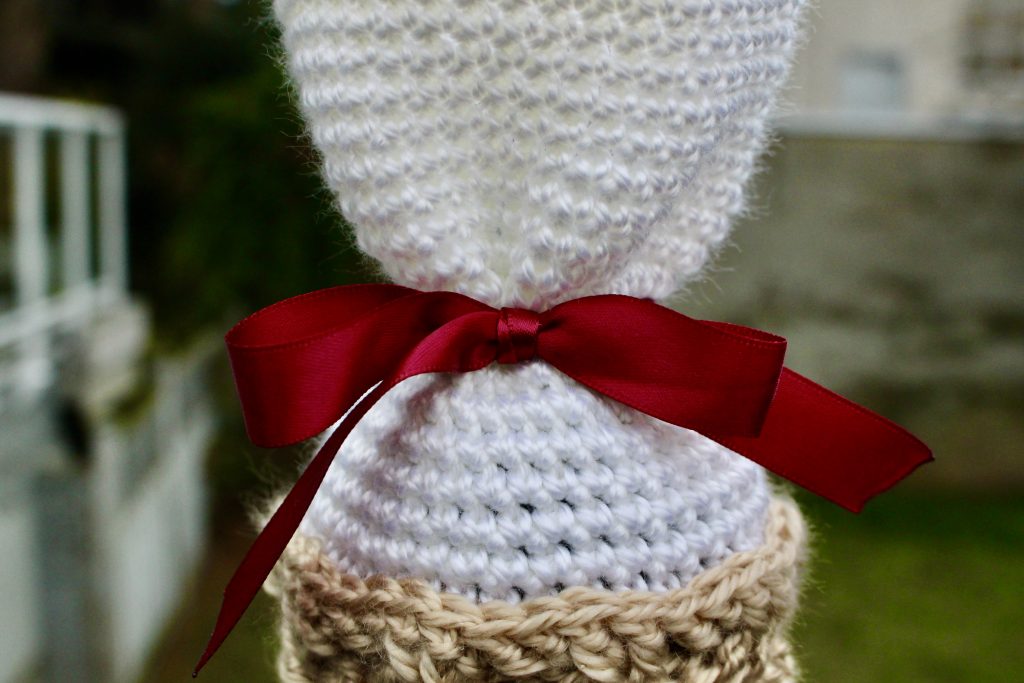
There are many things I like about this gift bag, one of which is its versatility with regard to gift occasion. The bag itself is both intricate and neutral in appearance, and is easily personalized with the ribbon tied around the bottle’s neck. You could match the tie to the label of the wine, for example. For an extra festive effect, the basket section could be crocheted in another colour (so, too, could the upper section, for that matter), and a yarn with a metallic thread would make it that much more sophisticated.

Celtic Weave Wine Gift Bag

Materials
Worsted-weight yarn in Tan and Cream
5.0mm (H) crochet hook
Stitch marker
Darning needle (to weave in ends)
YouTube (For Celtic Weave instructional video – https://youtu.be/FGAhOcPMiKY)
Ribbon/tie of choice

Abbreviations
SC – Single Crochet
ch – chain
st(s) – stitch(es)
BLO – Back Loops Only
DC – Double Crochet
FPDC – Front Post Double Crochet

Notes
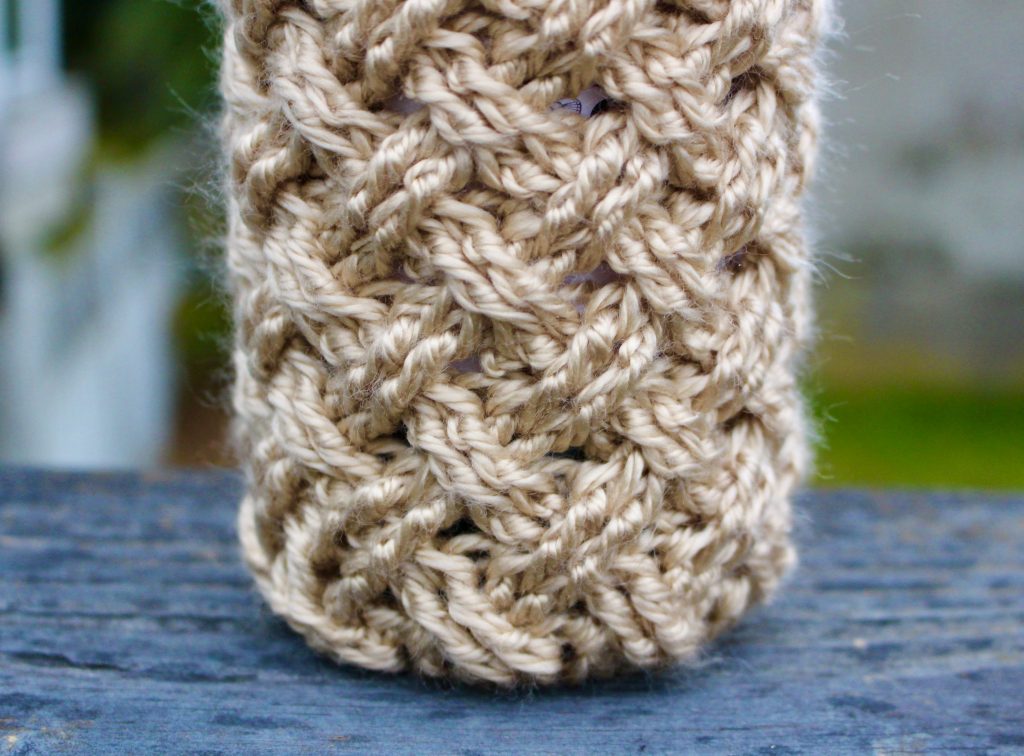
– The Celtic Weave stitch is difficult to write easily-understood instructions for, and so I have decided against doing so, recommending instead a YouTube video from Pattern Paradise to watch that clearly shows the steps.
– Beginning chain(s) do not count as the first stitch in each round. The first stitch is crocheted into the same stitch as the chain.
– Depending on the stiffness of your yarn and the looseness of your stitches, you may want to increase or decrease the number of rounds of the Celtic Weave and/or of the single crochet rounds above it. Your best bet is to test your gift bag on a wine bottle as you go, keeping in mind that the tie around the neck of the bottle might pull the basket part up or the upper fabric part down.

Instructions
Begin with Tan yarn.
Round 1: SC x 8 in magic ring, join, ch1. (8 sts)
Round 2: 2SC in each st around, join, ch1. (16 sts)
Round 3: SC in first st, 2SC in next, repeat [SC, 2SC] pattern all the way around, join, ch1. (24 sts)
Round 4: 2SC in first st, SC in next, SC in next, continue [2SC, SC, SC] pattern all the way around, join, ch1. (32 sts)
Round 5: SC in first st, SC in next, SC in next, 2SC in next, continue [SC, SC, SC, 2SC] pattern all the way around, join, ch2. (40 sts)
Round 6: DC in BLO of each st all the way around, join, ch3. (40 sts)
Rounds 7 – 20: Celtic Weave stitch pattern begins. Please go to https://youtu.be/FGAhOcPMiKY to learn more. At the end of Round 20, join, ch2. (40 sts)
Round 21: FPDC around every st, join, fasten off. (40 sts)
Round 22: This round will be crocheted into the top of the sts of Round 19, which you will find behind and just below the FPDC stitches of Round 20. Join Cream yarn with SC, SC into every stitch around, do not join.
Rounds 23 – 40: SC into first st of round, place marker in this st, then SC in continuous rounds, placing marker in the first st of each round. Join and fasten off. Weave in ends.

Love,
Nicole

Changing Out Some Christmas Lights

Happy Third Day of Christmas!

After I finished the Retro Ornament throw (see previous post), I started playing around with the Christmas Light Granny Squares again, and ended up coming up with a new design of the square that is less rectangular, more symmetrical, and looks a little more like a Christmas light. Check out the comparison below.

The square on the left is from the original pattern, and the one on the right is my re-design. The yarn colour is meant to be purple, but is more like magenta.

I crocheted the original square with a 5mm hook and Bernat Premium yarn, and it came out smaller than the dimensions provided, as it seems I am quite a tight crocheter. My variation, on the right, was crocheted with the same yarn and a 6mm hook, which increases its size while giving it a slightly better drape.

The original pattern can be found here, and here you’ll find the pattern for the wonderful Christmas Lights blanket.

I’m planning to complete the same blanket, including that pretty candy cane border, with my version of the Christmas Lights Granny Square, with 7 squares across and 9 squares down (you’ll find the pattern for my squares at the end of this post).

So far I’ve crocheted the first 7 squares across, and tested the Christmas Light layout (keeping in mind that I will be surface stitching a “cord” connecting the lights, as per the blanket pattern) using Stitch Fiddle‘s cross stitch chart maker.

For the chart on the left, I arranged the lights so that the colour pattern (R, O, Y, G, B, P) repeats, going left to right in the top row, then down and right to left in the second row, then down and right to left in the third row, and so on. For the chart on the right, the difference is the colour pattern; it begins the same way, but then goes in reverse order (P, B, G, Y, O, R), and then in forward order, and so on. Note that red and purple are anchor colours, and so don’t repeat as often as on the chart on the left.

I prefer the chart on the left, and will be following that one when constructing my Christmas Lights blanket. Below you’ll find the pattern for my version of the Christmas Lights Granny Square.

Christmas Lights Granny Square (Re-Design)

Materials
Worsted-weight yarn in six lightbulb colours of choice, as well as white, light grey, and black
6.0mm (J) crochet hook
Darning needle (for weaving in ends)

Abbreviations
SC – Single Crochet
st – stitch(es)
ch – Chain(s)
HDC – Half Double Crochet
DC – Double Crochet
TrC – Treble Crochet
sp. – space

Pattern Notes
– Beginning chain 1s (in lightbulb) do not count as the first stitch in each round. The first stitch is crocheted into the same stitch as the chain.
– Numbers before stitches indicate how many of those stitches go into the next stitch. Numbers after the ‘x’ indicate how many stitches to repeat. (Example: For 2SC x 3, crochet 2 SC stitches in each of the next 3 stitches.)
– Stitches between brackets are crocheted into the same stitch.

Instructions
Begin with one lightbulb colour of choice.
Round 1 – 8 SC in magic ring, join, ch1. (8 st)
Round 2 – 2SC x 3, (HDC, DC), (DC, HDC), 2SC x 3, join, ch1. (16 st)
Round 3 – 2SC x 2, SC x 4, (SC, HDC), (HDC, DC), (DC, HDC), (HDC, SC), SC x 4, 2SC x 2, join, ch1. (24 st)
Round 4 – 2SC x 3, SC x 8, (HDC, DC), (DC, HDC), SC x 8, 2SC x 3, join, fasten off. (32 st)
Round 5 – Join white yarn to 5th stitch from join, (DC, ch1, 2DC), HDC x 6, DC x 2, (2TrC, ch1, DC), (DC, HDC), 2SC x 2, (HDC, DC), (DC, ch1, 2TrC), DC x 2, HDC x 6, (2DC, ch1, DC), DC, join black and carry white, DC x 6, switch back to white, DC, join, ch3 (counts as first DC in next round). (44 st + 4 ch)
Round 6 – (DC, ch2, DC) in ch1 sp., DC x 12, (DC, ch2, DC) in ch1 sp., DC x 10, (DC, ch2, DC) in ch1 sp., DC x 12, (DC, ch2, DC) in ch1 sp., DC x 2, HDC x 6, DC, join, ch3. (52 st + 8 ch)
Round 7 – DC, (DC, ch2, DC) in ch2 sp., DC x 14, (DC, ch2, DC) in ch2 sp, DC x 12, (DC, ch. 2, DC) in ch2 sp, DC x 14, (DC, ch2, DC) in ch2 sp, DC x 10, join, fasten off. (60 st + 8 ch)
Round 9 – Join light grey in top left corner, (SC, ch2, SC) in ch2 sp, SC x 16, (SC, ch2, SC) in ch2 sp, SC x 14, (SC, ch2, SC) in ch2 sp, SC x 16, (SC, ch2, SC) in ch2 sp, SC x 14, join, fasten off. (68 st + 8 ch) Weave in ends.

I’ll post my version of the Christmas Lights Granny Square blanket once I’ve completed it.

In the meantime, best wishes for the holidays!

Love,
Nicole

April Showers bring… Christmas flowers?

I’m not exactly sure what has come over me (though I have a list of ideas, which I won’t share so that you don’t get acquainted with me TOO quickly ;)), but I’ve gotten into the Christmas spirit. And it’s only May. 

I felt the urge to look up crochet patterns for Christmas throws a couple of weeks ago, one for my sister and her husband, and one for my parents. I’ve gotten into the habit of giving them gift cards over the last several years, and that’s been especially convenient now that I no longer live in Toronto. But gift cards are not really as meaningful as something handmade (especially when they can afford all the things they want anyway), so I thought I’d take advantage of my motivation and attempt to make them Christmas throws this year. 

The pattern for the Christmas Lights Blanket by Repeat Crafter Me, which I chose for my sister, is fairly simple, but really colourful and festive. I loved it as soon as I saw it, and was really excited to pick up the yarn I needed (I chose to work with Bernat Premium yarn, which I had been squishing in Walmart every so often over the last while, instead of Bernat Super Value). As you can see from the picture, I have already made several squares, and plan to make a six-by-seven-square blanket (42 squares total) with a wide border (maybe in moss stitch) to increase its size, and definitely the candy cane edging from the pattern.

For my parents I chose the Retro Ornament Throw from Red Heart, the pattern for which is a little more complex than the Christmas Lights Blanket, but is so beautiful and I think will be to my parents’ tastes. I was only able to buy a couple of the colours for this throw at Michaels, and ended up ordering the rest of the required yarn from yarncanada.ca, which happens to ship from New Westminster, BC, just a little sail to where I live on Vancouver Island. I received my shipment quickly and, after watching the very helpful YouTube videos, I got started right away. It’s been almost a week and I have finished almost a quarter of the throw (the third “strip” of ornaments hasn’t been joined yet). 

I have to admit I’m a little amazed that I’m so eagerly tackling not just one but two larger projects. I tend to lose interest pretty quickly, and usually stick to smaller projects (I’ve been enjoying making amigurumi plushies for my kids lately), but I won’t be talking myself out of it! I sincerely hope that my motivation continues so that the work doesn’t become too much of a chore.

Also coincidentally, my Christmas cactus bloomed a few days ago! I don’t know WHAT’S going on, but it seems the spirit of creating is going strong at my house!


Looking forward to posting photos of the finished pieces…

Love,                                                                                                                                                Nicole